Making SENSE of the Atari Audio Regulator’s
Self-Destructive Behavior
(aka. Atari’s Little Problem
Child)
My daughter
then replied, “So it’s basically Emo.”
Yeah… Emo. That about sums it up. If you’ve
been with the classic arcade collecting nerd-collective for a respectable
amount of time you probably recognize some key words thrown around related to
Atari hardware – Audio, Regulator, Sense Mod, R29, R30, +5V Adjust POT, along
with a slew of precise expletives describing the frustrations associated with
dealing with this hardware. So what are we talking about here? The Atari Audio
Regulator (AR) is a voltage regulation and audio signal amplification board
which was commonly used in Atari vids toward the late 1970’s to early 80’s. The
idea was to create a separate, modular board that would off-load the beefy
power regulation and audio requirements that the large main CPU boards
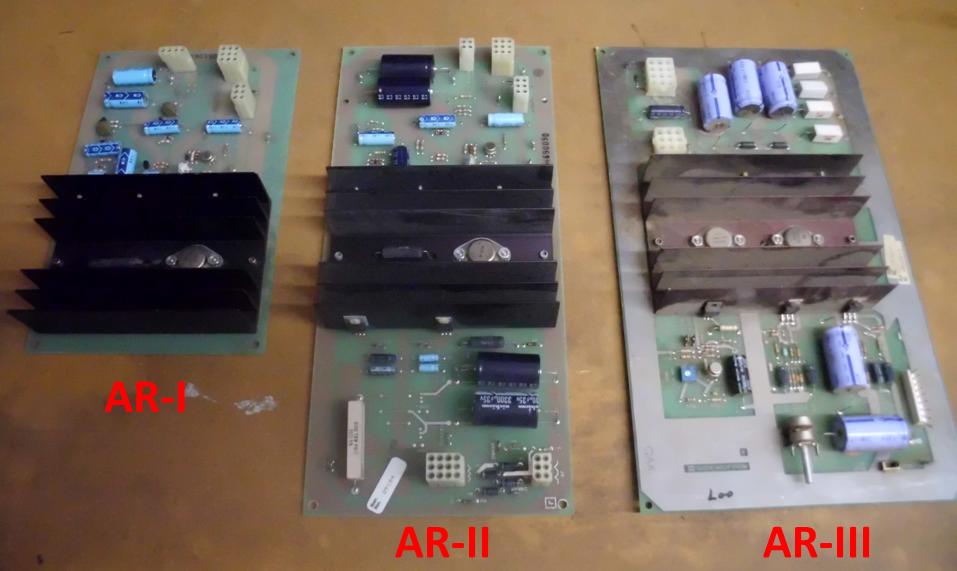
demanded. Thus the AR-I (‘AR one’) was born. Games like Asteroids, Asteroids
Deluxe, and Lunar Lander used this model. Future games had additional voltage
requirements, and so the AR-II (‘two’) was born. This was roughly twice the
size of its predecessor and featured additional capability. What was nice is
that Atari made all of the AR-I and AR-II hardware revisions all electrically
compatible! This means that in some cases an AR board with a superset of
features could take the place of lesser AR’s, and there’s no penalty for
mistakenly installing a lesser board where a superset board is needed. But then
of course around 1984-ish Atari came to their senses and for their System-1
hardware produced the AR-III which was not compatible in any way with its
predecessors.
What the AR-III did leave
behind to the I and II was the uncanny ability for the
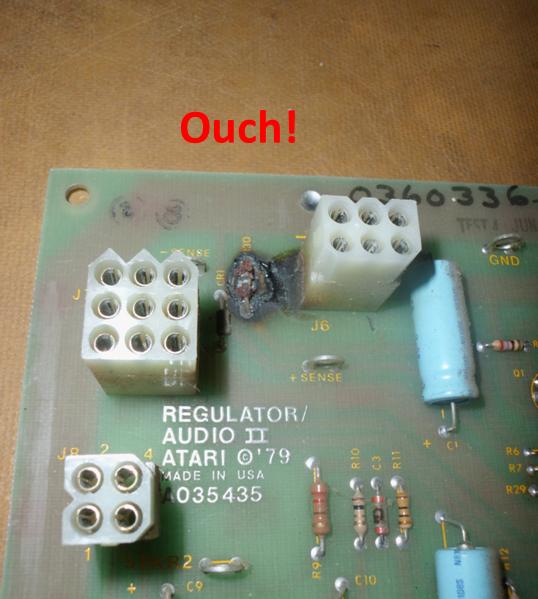
+5V SENSE circuit to melt down. You might have run into this before. You’re
happily racing away on your Pole Position when all of the sudden PFFFPT!.. the screen goes dark and an
acrid cloud of oh-sh*t begins to emanate from the
back door. The result is one or two nice little burn marks at conspicuous
places on the AR-II board like the thing decided to cut itself to get
attention. So what really happened?
To understand the reasons
and mystery surrounding the AR’s petulant behavior we must first understand how
the thing was designed to operate, namely the +5V SENSE circuit. One of the
more critical voltages on the old main CPU game boards is the +5 volts. The IC
chips used on those boards enjoy having their +5V supply voltage within about
10% in order to stay happy. If the voltage strays too far the IC’s could either
receive damage from over-voltage or begin to flake out from under-voltage. To
combat this issue Atari engineers included a SENSE circuit with the +5V to help
keep the critical voltage within the acceptable range.
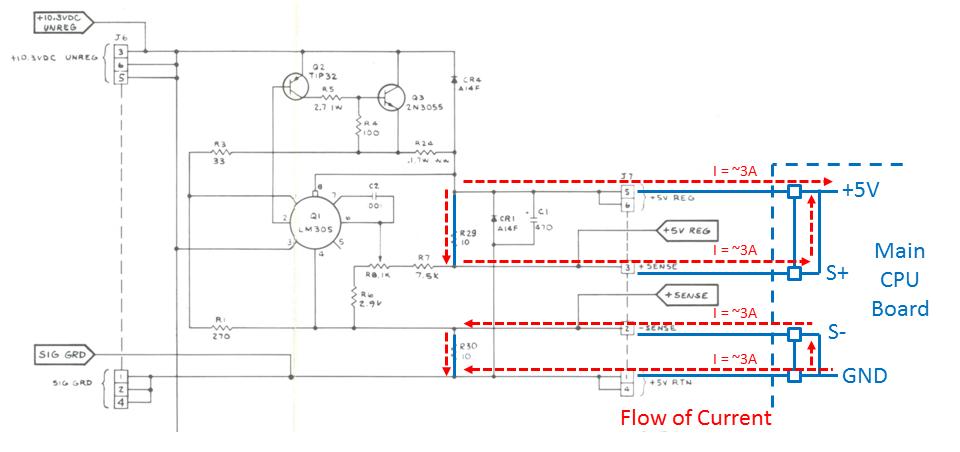
The SENSE circuit is
designed to mitigate what’s called “IR loss” across the wiring harness. To
understand this let’s start with Ohm’s Law which states Voltage = Current *
Resistance, or V=IR where the letter ‘I’ commonly denotes current. What this
says is that where current flows through a resistive device there will be a
voltage loss, or drop. This is what happens over the wiring harness. The wires
that carry power from the AR board to the main CPU board are slightly resistive
and look like a small resistor to the AR board, probably just a couple of Ohms.
With current flowing from the AR to the main board the wires will drop the
voltage by I*R. So instead of +5.0V the main board might see +4.7V. Now there’s
another set of wires that connect directly to the +5V and GND leads on the main
board and run back to the AR board. These are the SENSE lines. The SENSE
circuit on the AR board is able to sense these lines without drawing (nearly)
any current, and so the voltage sensed at the AR is virtually the same as the
actual +4.7V on the main board. The SENSE circuit then kicks up its voltage to
+5.3V and now the voltage at the main board becomes exactly +5.0V.
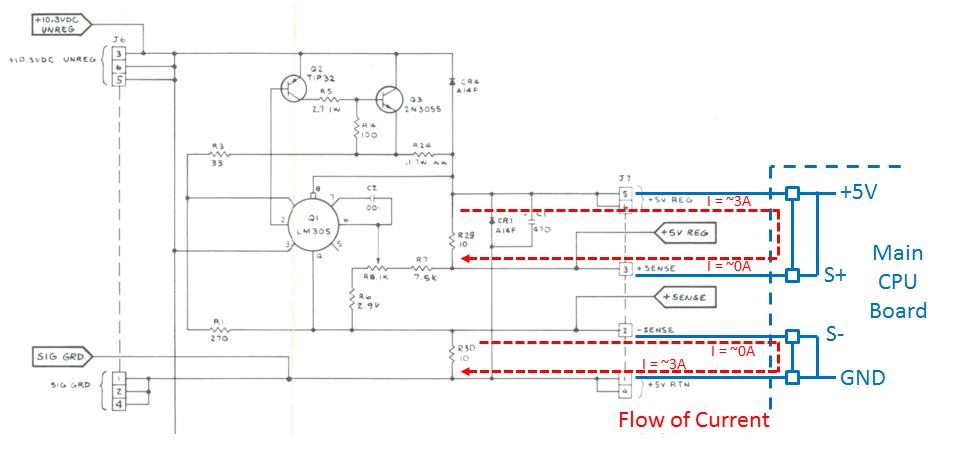
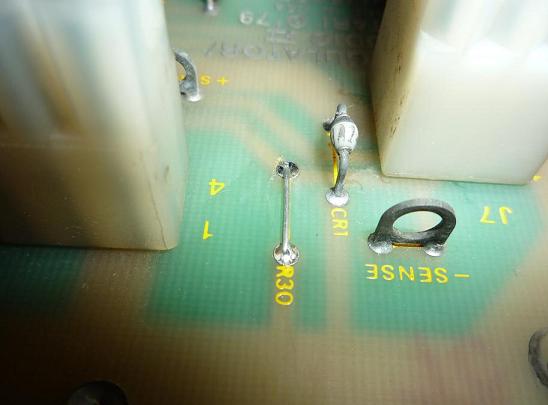
So what about the
resistors R29 and R30? These are shunting resistors that allow the SENSE
circuit to operate under no-load or very light load conditions. Without a main
board attached, or if the main board is drawing very little current, the
shunting resistors allow just enough current to flow back to the SENSE lines to
keep the correction loop at +5.0V. Without these in place the +5.0V would drift
quite a bit, usually up to around +7V. Although this really isn’t a big concern
since all Atari main boards draw more than enough current to keep the
correction loop going. So if the voltage would drift, either the main board is
not present or there’s something already faulty with it. Nonetheless R29 and
R30 are there standing guard over the +5V output.
That’s the way things are
supposed to work and for the most part they work fairly well. Where things
begin to awry is when the resistance increases across the power lines in the
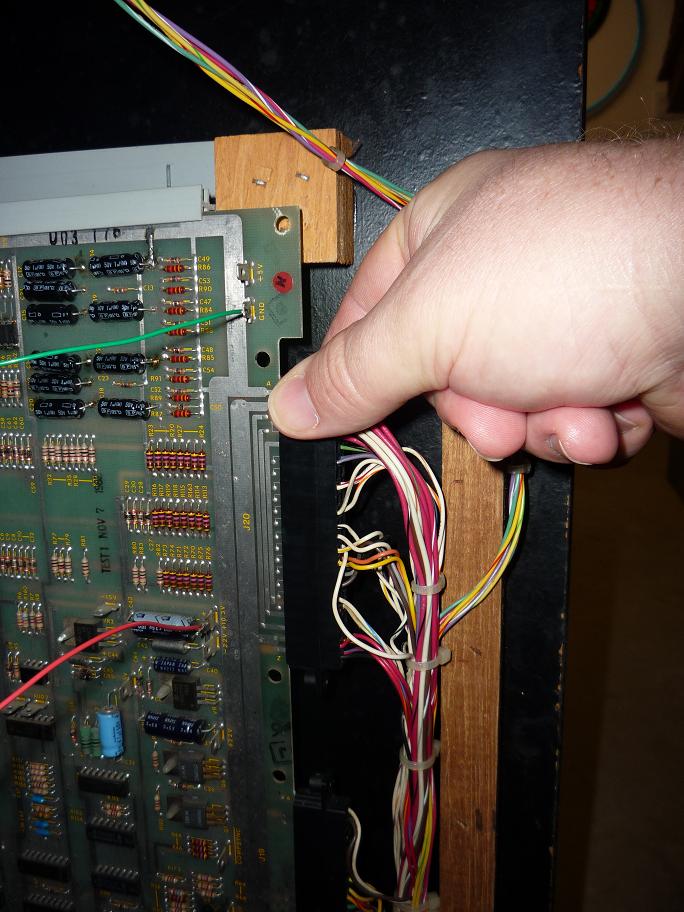
wiring harness. Let me explain. There are usually two long plug receptacles on
the wiring harness that plug onto the edge connector on the main CPU board.
These are crimp housings that hold crimp pins that are springy. When you slide
the crimp housings onto the edge connector the crimps make contact with the
pads on the edge connector. This is how power and signals travel to and from
the main CPU board from other parts of the game like the control panel, power
supply, monitor, etc. This is also where the +5V comes from the AR board. Many
times the metal composition of the crimp pins is slightly different than the
pads on the edge connector. Whenever you have two dissimilar metals in contact,
over many years the two metals will form an insulating layer between them.
Essentially they begin to corrode. This insulating layer makes it slightly more
difficult for current to pass and thus raises the resistance of the connection.
Wait, it gets worse. With
added resistance also comes added heat. As current passes through a resistor,
the resistor dissipates part of the current as heat. This is given by P = I*V
where P is power measured in Watts. You may have seen how resistors are rated
by Watts (i.e. 1/4 W resistor). This is a measure of how much power the
resistor can safely handle. So as the resistance of the crimp connection
increases so does the amount of power dissipation in the form of heat. Note
from science class that as you heat a metal it will oxidize or tarnish, and
become more resistive! With increased resistance comes a bigger voltage drop,
and the AR board is forced to keep kicking up the +5V to compensate. This
brings more current across the connection, and the vicious cycle repeats. What
eventually happens is the crimp connection becomes so resistive and dissipates
so much heat that the crimp connection melts down completely and you end up
with a nice little burned place on the edge connector where the pad used to be.
This is bad news for the AR board.
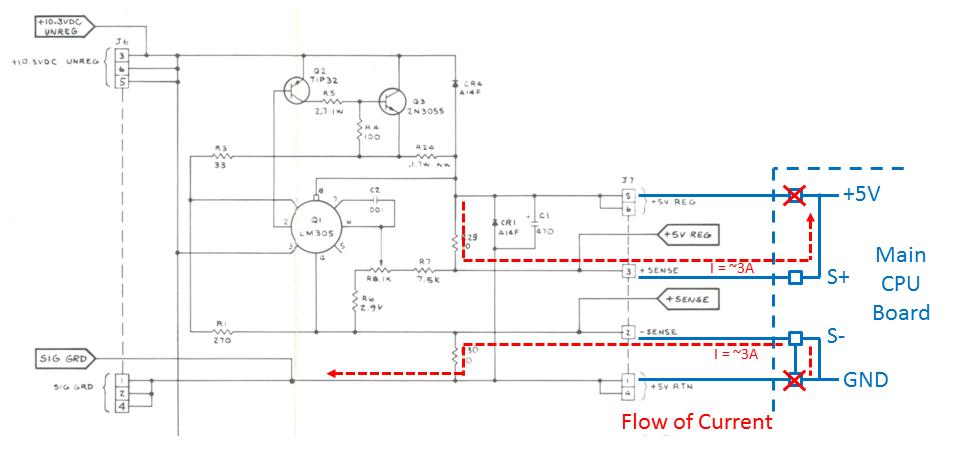
Take a look at the SENSE
circuit again. With the +5V pad on the edge connector burned to a crisp there
is no more connection there to carry current. The connection is completely
broken. However if you notice the connection for the SENSE lines are still
intact. With the main CPU board still demanding current the AR will suddenly
begin using the SENSE lines to try to supply +5V to the main board. But to
supply +5V through that path the current must pass through the 10 Ohm R29
and/or R30 resistors. Now Atari main boards can draw up to 6 Amps for games
like Pole Position (tech: remember that multiple AR’s aren’t load-balanced!) so
the little 1/4 W resistors are suddenly asked to handle a full P = I*V = 6A *
5V = 30 Watts of power! At this point the resistors are less like resistors and
more like fuses. And they blow in a fury of smoke, flame, and teenage hormones.
So what can be done? The
best thing to do is to periodically inspect your edge connectors for any signs
of dirt, oxidation or damage and clean or replace the crimps as needed. You can
use a clean lint-free rag and rubbing alcohol (isopropyl) or acetone. A Q-tip
works well for getting between the crimps in the crimp housing. You can also
use a fiberglass pencil or a pencil eraser to clean them. How often is often
enough? It depends on the game, how much use it gets, etc. Checking them once
every few months should be more than enough. A good way to tell if you
currently have a problem is to leave the game on for an hour or so and then feel
the crimp housing with your fingers. If the crimp housing is warm, then you
should clean or replace.
As far as making
preventative modifications go there really is no decent solution. You might
have heard of the “AR SENSE mod”. We will talk about this in a minute. Some
alternatives include adding extra lengths of wire that run from the AR board’s
+5V and GND test points to corresponding test points on the main CPU board.
Adding extra power lines in parallel doubles the amount of current-carrying
capacity and allows the connections to run cooler. You can also swap out the 10
Ohm resistors R29 and R30 for a higher value such as 100 Ohms. This allows the
SENSE lines to handle more push from the AR, but this is more of a stop-gap
measure. Another option is to cut off the crimp, strip the wire, and solder the
wire directly to the pad on the edge connector. But that’s messy and makes it
difficult to separate the wiring harness from the main CPU board. Yet another
option is to replace R29 and R30 with new 10 Ohm resistors and install them
such that they ride well above the board. This way if and when they do melt
down they will be less likely to burn the board.

The other option is to
perform the SENSE mod on the AR board. The purpose of the sense mod is to cut
the voltage correction loop and prevent the hormonal runaway meltdown of smoke and fire
from occurring. What we do is either bypass R29 and R30 or
replace them altogether with wire shunts. This allows the sense circuit to see
not the voltage at the main CPU board but the voltage directly on the AR board,
which should always be +5.0V despite whatever voltage drop is experienced at
the main CPU board.
Performing the SENSE mod
is considered to be taboo in some circles. The argument is that if you keep
your edge connectors and crimps clean then there’s no reason to modify the AR
board from its factory configuration. And this is true. However, you need to
ask yourself how many times you’ve cleaned your edge connectors since you’ve
owned games? Maybe after reading this article you will from now on! But what if
instead your games could tell you when they needed their connectors cleaned?
This is one of the positive points of doing the sense mod. With the sense mod
in place the AR board will not try to correct the +5V at the main board.
Instead it will let it droop when the connectors get
dirty or tarnished. As the +5V drops down below about +4.5V the main board will
begin to shows signs of flaking out. You’ll see intermittent resets,
maybe screen RAM defects, etc. With the SENSE mod in the back of your mind you
will remember that your game might be telling you it’s time to clean the edge
connectors!
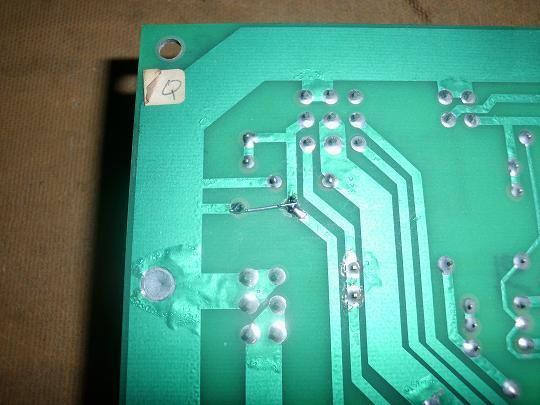
To do the SENSE mod all
you have to do is remove R29 and R30 and replace them with wires. Clipping the
leads off a new resistor or capacitor and using those works fine. Another
argument against the SENSE mod is that it looks bad, or non-original. No
problem! You can flip the AR board over and solder the wires to the backside.
Here attach jumpers to the backsides of R29 and R30.
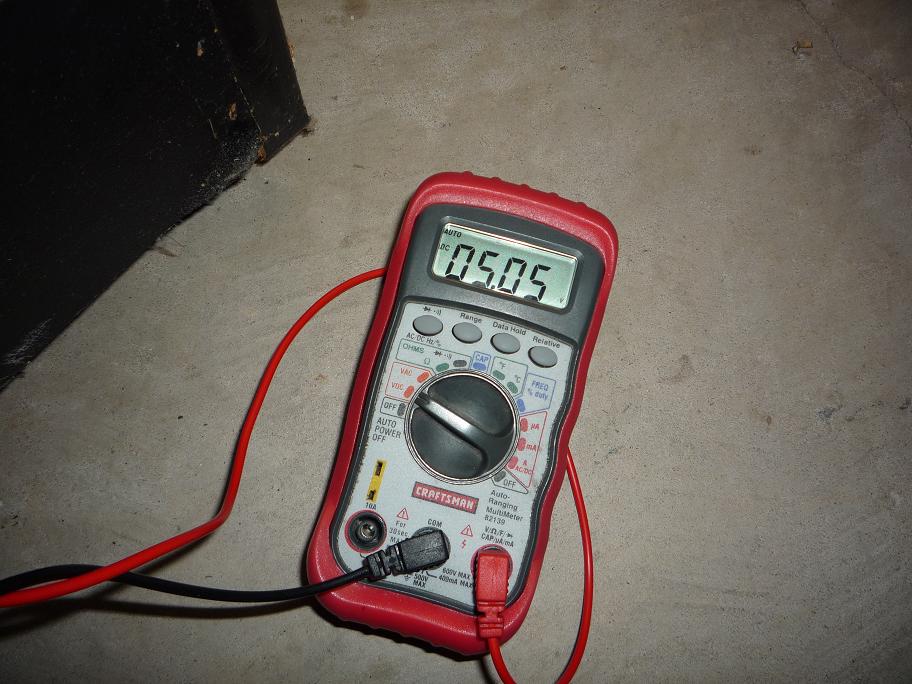
Once you’ve SENSE modded your AR board and everything looks fine, install the
AR board and power on. There’s one last step – you need to adjust the +5V
manually on the AR board so the main board is happy. Set your multimeter for volts DC and measure the +5V on the main CPU
board. Now adjust the POT on the AR board until the voltage on the main CPU
board is exactly +5.0V. That’s it you’re done! With the SENSE mod in place you
can worry less about your AR board throwing another temper tantrum and more
about qualifying around the track.
Whether you choose to
perform the SENSE mod or keep your AR board all-original, it’s important to
understand the reasoning behind your decision. Hopefully this article gives you
the insight you need to make the right decision for your games. Have fun with
them!