<<<
Atari Power Supplies
The Atari Power Brick
The Atari Power Brick is the big metal box-looking thing
hanging out down below like a big fat catfish wallowing in the gunk and dust at
the bottom of your cabinet. This is where 120VAC power comes in and gets
transformed into lower voltages and distributed to different parts of your
game. Figure 1 show the Power Brick. Yours might look a little different but
they all have the same basic components.
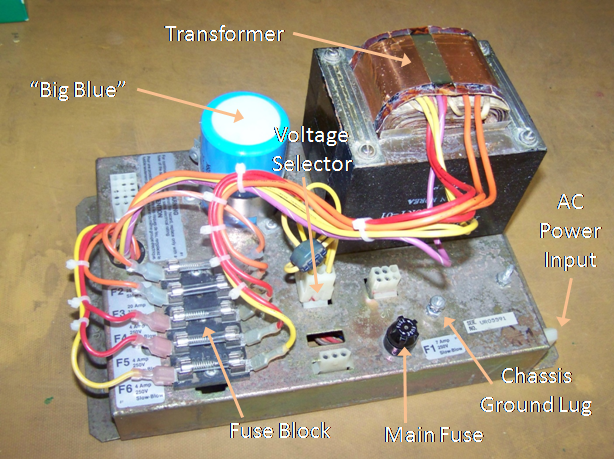
Figure 1: The Atari Power Brick (Catfish)
Transformer – Converts the 120VAC power input into lower AC
voltages. Sorry, it won’t change into a giant robot or anything.
The Atari “Big Blue” – You may have heard some folks talk
about this. This is the large filter capacitor which smoothes out the DC
voltage after it’s been rectified from AC voltage. These are electrolytic
capacitors which tend to dry out over time and lose their capacitive ability.
When that happens, they will filter less, and allow more of an AC component
onto your DC voltage. This can sometimes affect the way your main CPU board
works including random resetting, logic errors, and lots of other nasty
surprises. If you’re experiencing one or more of these symptoms, replacing the
Big Blue on an original power brick is usually a good idea.
Voltage Selector – This is a self-contained wiring
harness on a Molex connector which selects what AC voltage the power brick expects
from your wall outlet. A different Voltage Selector is used depending in what
country it’s meant to operate.
Main Fuse – Fuses the 120VAC coming in from
your wall socket. A fuse will protect against shorts in the circuits
downstream. If there is a fault somewhere, either this fuse or a fuse further
downstream will blow and prevent something more catastrophic, like a fire.
Fuse Block – More fuses, strategically placed
in the Brick’s various output voltages.
Chassis Ground Lug – There are different kinds of grounds
with chassis ground being the one tied back to the ground pin on the power plug
which plugs into your wall socket. In fact, all of the grounds in your game are
ultimately tied back to the ground pin on the power plug. This includes
anything metal in your game, i.e. coin door, control panel, monitor frame,
PCBs, everything. This is done to keep all of the metal components at the same
voltage (ground) potential as the customer about to insert a quarter. All too
often we’ll find games with the power plug ground lead cut off. Since the metal
components in a game don’t have a ground reference to the rest of the world,
their voltage potential will tend to drift above or below the voltage potential
of a customer, and when they go to touch the coin door with a quarter, or touch
the control panel, ZAP! Oww. They get a nice little static discharge and a
Pavlovian reminder not to operate games with the ground pin on the power cord
cut.
If you turn the Power Brick over, you can see a couple more
basic components.
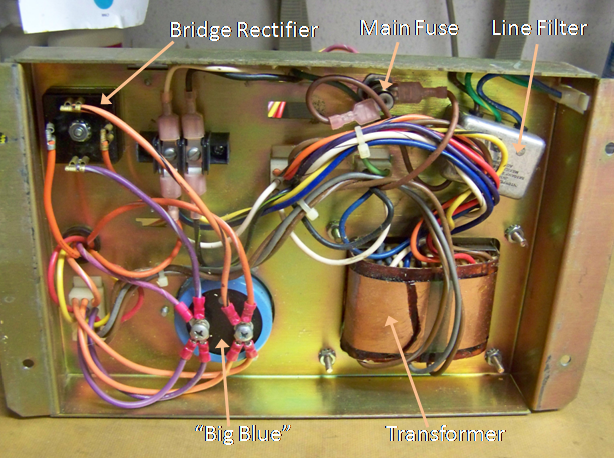
Figure 2: Power Brick Under the Hood
Bridge Rectifier – This device changes AC voltage
into DC voltage. Sometimes the little tab closest to the metal box gets bent
and makes contact with the box. If you see this, WITH POWER UNPLUGGED, bend the
lead away from the wall of the box.
Line Filter – This device helps to filter out
any unwanted AC components on your incoming 120VAC from the wall outlet.
Unwanted AC components can propagate through your game and mess up things and
look similar to a bad Big Blue problem. These rarely go bad though.
Now that you’ve been formally introduced, next step is to
determine what kind of Atari Power Brick is in your game.